Most computer troubleshooting means applying one of the 10 following tips to a difficult situation until your find the problem. Once you identify the problem, the solution is rarely further away than a quick Google search or a trip to your local computer parts store.
Computer Troubleshooting Tip #1: Reboot The Computer
If you call up the tech support at your company, the first thing they’ll tell you to do is reboot your computer. Rebooting a computer almost never fixes the underlying problem, but it can quickly make your computer usable again (and get you off the tech support line), so tech support personal love this tip. You might have a computer black screen and they will still tell you to reboot your computer.
Computer Troubleshooting Tip #2: Run A Full-Disk Virus Scan
One way viruses try to hide from virus removal software is by hiding themselves inside Microsoft Windows or inside other programs on your computer, so when Windows or a program starts to act strangely, you should check to see if you have a virus. A full-disk virus scan will take a while, so start the scan before you head out to lunch.
Computer Troubleshooting Tip #3: Use A POST Card
Every PC (and Intel Macintosh) performs a Power-On Self-Test (POST) check when it boots. As the computer checks each of its components, it sends a code to the PCI port on your motherboard. A cheap POST-code checker can show you what’s going on even if your computer doesn’t boot completely so that you can run a quick Google search to find out which part in your computer has failed.
For more information, see our previous article about POST code detection.
Computer Troubleshooting Tip #4: Minimal Reproduction
If you keep having the same problem, then simple band-aids like rebooting the computer aren’t the best solution. You need to fix the problem for real, so use the same technique real system administrators and programmers use to find the root cause of the problem. The technique is called “minimal steps to reproduce.”
First, figure out how to consistently cause the problem. If your computer keeps freezing, figure out that it always freezes immediately after you save a file and remove your USB drive.
Next, try reducing the number of steps to reproduce the problem. Following our previous example, see if the computer freezes when you remove your USB drive even if you haven’t saved a file.
Keep trying to reduce the number of steps to reproduce the problem. When you find the minimal set of steps, you’ll know exactly what causes the problem and you can do a quick search on Google to see who else has had the same problem and what they did to fix it. Or you can take the problem to the people who wrote the software or built the hardware and ask them to fix it for you.
Computer Troubleshooting Tip #5: Sleep On It
Most people hate this advice. When they’re having a problem, they want it fixed now. That’s natural, but trust me—if you wait to fix the problem, the answer will usually come to you much quicker and with much less frustration than if you keep working at all night long. And sometimes, if you wait, the problem will fix itself.
Computer Troubleshooting Tip #6: Create A New Account
Most programs on your computer have two sets of settings. One set is global—it’s shared between all of the users on your computer. The other set is local—it applies to each user individually. If you think these local settings might be the problem, try creating a new user account and then run your software.
If the software runs correctly on the new user account, then you can copy the new user’s settings file over your old user’s settings file so that the program will work on your old user account.
Computer Troubleshooting Tip #7: Reinstall
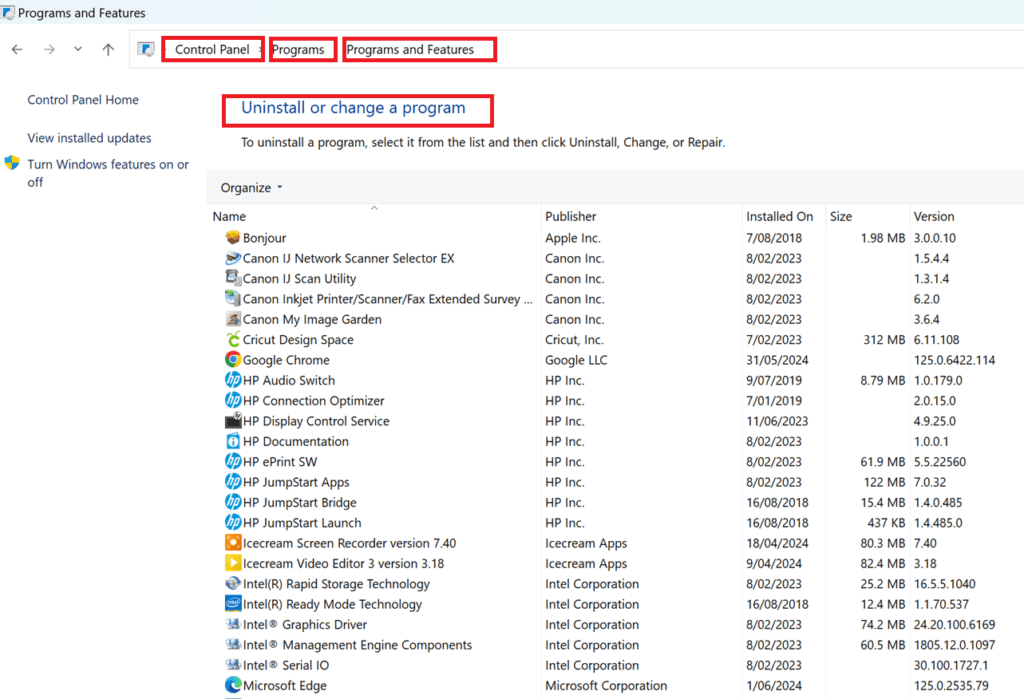
This is a little bit like rebooting, but it can provide a real long-term fix. Go into the Microsoft Windows Add/Remove Programs wizard from the Windows Control Panel and remove the program (or programs) that are causing problems. Then install them again and see if that fixes your problem.

If the programs access important data, I highly recommend you make a full system backup before you uninstall the programs. (See our articles about easy and cheap backups for more information.)
Computer Troubleshooting Tip #8: Run A Registry Cleaner
I have to confess—I’ve never run a registry cleaner on my own computer. That’s because I’m very selective about what software I install. But it can be very useful to run a registry cleaner on a computer used to install random software from the Internet. Old and poorly-written programs can leave all sorts of problems in your Windows Registry that will affect the programs you run.
And, even if the registry cleaner doesn’t fix your problem, it may provide some other benefits—like making Windows boot faster when you turn your computer on in the morning.
A quick search of Google turns up dozens of registry cleaner programs available for immediate Internet download.
Computer Troubleshooting Tip #9: Re-seat Hardware
Many computers today are loaded down with removable peripherals—from your graphics card to your disk drive to all of your USB devices, most things can be easily removed.
But devices that can be easily removed can also slide out accidentally. A device that isn’t making full contact with your computer’s connectors will often fail in weird ways. Your disk drive may open some files and not others; your graphics card may display lines when it gets hot but not when it’s still cool; your USB scanner may reset randomly in the middle of a scan.
All you have to do is pull out the troublesome device or cord and then put it back in. For USB devices this couldn’t be easier. For hardware inside your computer case, it can be a bit more annoying—but anything that can fix your problems quickly is worth trying.
Computer Troubleshooting Tip #10: Check Your Computer Memory (RAM)
If none of the tips above fixed your problem, it’s time to look at computing’s biggest bogeyman—computer memory. In the olden days, computer memory (RAM) was highly unreliable, so it came with a “parity check” which would detect errors every time you used your computer memory, but for cost and speed reasons, RAM manufacturers no longer include parity on most consumer RAM.
That means that when your RAM goes bad, there’s nothing your computer can do but accept bad data. That bad data prevents programs from running the way the programmers programmed them, which can cause all sorts of weird and seemingly unrelated problems.
The solution is simple: check your RAM. I highly recommend using the free memory checker available at MemTest86.com. The longer it runs, the better the chance it will detect bad RAM, so I suggest you start it before you go to bed and check the results in the morning when you wake up.
If none of these ten computer troubleshooting tips fixed your problem, then it’s probably time to bring your computer to a technician.


Great tips.
The minimal reproduction tip is really usefull. It makes sense to do this but I actually never thought of it. It’s a lot easier to figure out how to fix the problem if you know what is really causing it.