If you would like to install software on Windows, it is a straightforward process that can enhance your computer’s functionality. Whether you need to install a new application for work, entertainment, or productivity, this tutorial will guide you through the steps of Windows software installation, from downloading the software to completing the installation process.
Ensuring Your Computer is Compatible and Able to Handle Software Before Downloading
Before downloading and installing new software, it is essential to verify that your computer meets the necessary requirements to run the application smoothly. This step helps prevent potential issues such as system crashes, slow performance, or incomplete installations. Here’s how you can check your computer’s compatibility and capability:
1. Check System Requirements For Windows Software Installation
Definition: System requirements are the minimum and recommended specifications that your computer must meet to run the software efficiently.
Steps to Check System Requirements:
- Visit the Software’s Official Website:
- Go to the official website of the software you want to install. Look for a section labeled “System Requirements” or “Technical Specifications.”
- Review Minimum and Recommended Requirements:
- Minimum Requirements: These are the basic specifications your computer must meet to run the software. Running software on minimum requirements may not provide the best experience.
- Recommended Requirements: These specifications are suggested for optimal performance. Aim to meet or exceed these for the best experience.
Common System Requirements:
- Operating System (OS): Ensure your OS version is supported (e.g., Windows 10, Windows 11).
- Processor (CPU): Check the required processor speed and type (e.g., Intel i5, AMD Ryzen 5).
- Memory (RAM): Verify the amount of RAM needed (e.g., 4GB minimum, 8GB recommended).
- Storage Space: Ensure you have enough free disk space for installation (e.g., 20GB free).
- Graphics: Some software, especially games and graphic design tools, require specific GPU capabilities.
- DirectX Version: Certain applications may require a specific DirectX version.
2. Check Your Computer’s Specifications
Steps to Check Your Computer’s Specs:
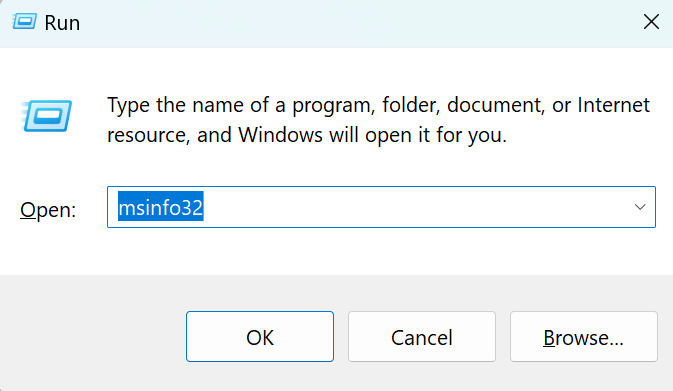
- Open System Information:
- Press
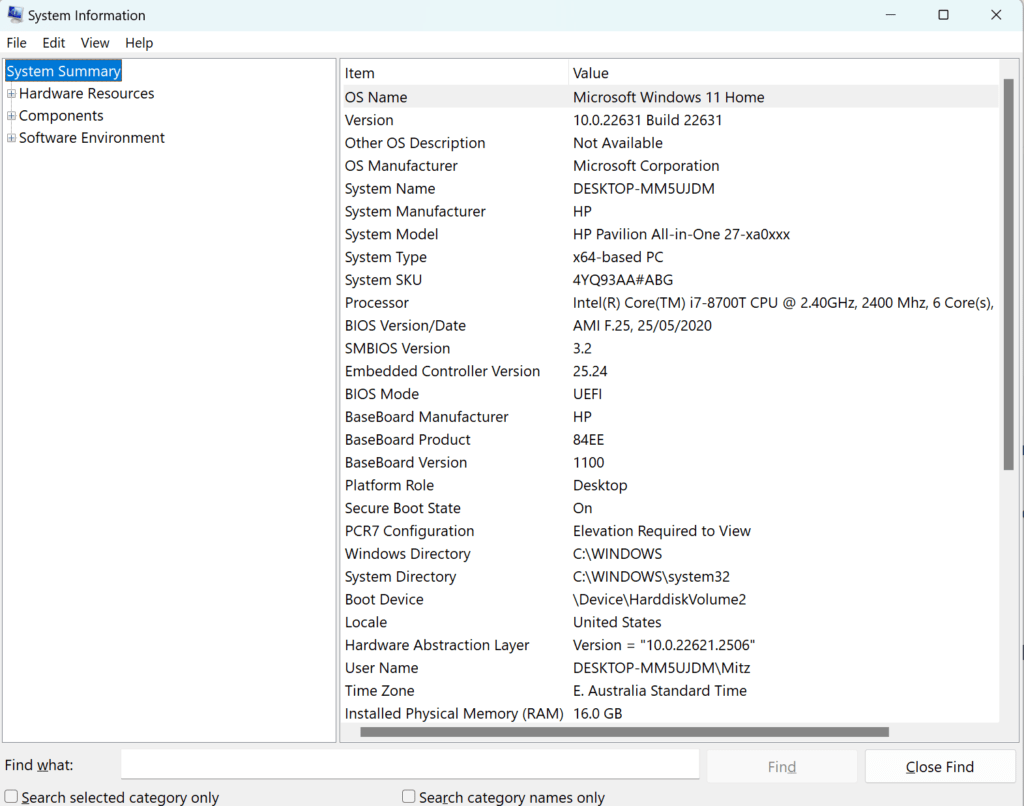
Windows + R, typemsinfo32, and pressEnter. This will open the System Information window.
- Press

2. Review Key Specs:
- Operating System: Listed at the top of the System Information window.
- Processor: Check the “Processor” entry for details about your CPU.
- Memory (RAM): Look at the “Installed Physical Memory (RAM)” entry.
- Storage: Open File Explorer, right-click on the drive where you plan to install the software, and select “Properties” to check available space.
- Graphics: For GPU information, you can go to Device Manager (
Windows + X> Device Manager > Display adapters).
Also see what is software.
Step 1: Download Software To Install Software on Windows
- Identify the Software:
- Determine the software you need to install. Make sure to download it from a reputable source to avoid malware. See this post about preventing computer viruses.
- Visit the Official Website:
- Go to the official website of the software. For example, if you need to install Google Chrome, visit Google Chrome’s official download page.
- Download the Installer:
- Locate the download button on the website. It is usually prominently displayed.
- Click the download button. Your browser will ask where you want to save the installer file. Choose a location that is easy to remember, such as the Desktop or Downloads folder.
- Wait for the download to complete.
Step 2: Open the Installer – Install Software on Windows
- Locate the Installer File:
- Navigate to the folder where you saved the downloaded installer file. Common file extensions for installers are
.exeand.msi.
- Navigate to the folder where you saved the downloaded installer file. Common file extensions for installers are
- Run the Installer:
- Double-click the installer file to run it.
- If prompted by User Account Control (UAC), click “Yes” to allow the installer to make changes to your device.
Step 3: Follow the Installation Wizard
- Start the Installation Wizard:
- Most software installations are guided by a wizard that helps you through the process.
- Read the End User License Agreement (EULA):
- Carefully read the EULA. If you agree with the terms, check the box that says “I agree to the terms and conditions” and click “Next.”
- Choose Installation Options:
- You may be given options such as choosing the installation location or selecting specific components to install. The default options are usually sufficient for most users.
- Click “Next” to proceed through the steps.
- Begin Installation:
- Once you have configured your installation options, click the “Install” button to begin the installation process.
- Wait for the installation to complete. This may take a few minutes depending on the size of the software and the speed of your computer.
Step 4: Complete the Installation
- Finish the Installation:
- Once the installation is complete, the wizard will notify you. Click “Finish” to close the installer.
- Launch the Software:
- After installation, you can usually find a shortcut on your Desktop or in the Start menu.
- Double-click the shortcut or search for the application in the Start menu to launch the software.
Step 5: Verify and Configure the Software
- Run the Application:
- Open the newly installed software to verify that it has been installed correctly.
- Complete Initial Setup:
- Some applications may require initial setup or configuration. Follow any on-screen instructions to complete this setup.
- Check for Updates:
- It’s a good practice to check for updates after installing new software. This ensures you have the latest features and security patches.
- Most software applications have an option to check for updates in the “Help” or “About” menu.
Additional Tips To Install Software on Windows
- Uninstall Unwanted Software: If you accidentally install unwanted software or no longer need an application, you can uninstall unwanted software via
Control Panel > Programs > Programs and Features. - Stay Secure: Always download software from official or reputable sources to avoid malware and security risks.
- Keep Software Updated: Regularly update your software to benefit from new features and security improvements.
By following this detailed, step-by-step software installation guide, you can efficiently install new applications on your Windows computer and ensure they are properly configured for use. This process applies to most software installations, making it a versatile guide for all your software needs.


