As a seasoned tech enthusiast who has assisted countless individuals with their computer setups, I know firsthand how crucial it is to have a properly functioning microphone. Whether you’re gearing up for an important Zoom meeting, streaming your latest gaming session, or simply chatting with friends and family, a clear and reliable microphone setup is essential. Setting up a microphone on Windows might seem straightforward, but ensuring it works flawlessly often requires some additional tweaking and troubleshooting.
This comprehensive guide will walk you through the process of setting up your microphone in Windows, adjusting settings for optimal performance, and troubleshooting common issues. By following these steps, you’ll be able to ensure your microphone delivers clear and consistent audio, making your communications and recordings as seamless as possible. From checking connections to fine-tuning settings and resolving technical problems, we’ve got you covered. Let’s dive in and get your microphone working perfectly on your Windows system.
Setting Up Your Microphone
1. Connect the Microphone
- USB Microphone: Plug the microphone into an available USB port on your computer. This plug and play microphone, Anykuu USB Mic, doesn’t need any adjustments after plugging in.
- 3.5mm Jack Microphone: Connect the microphone to the appropriate audio jack on your computer. Usually, the microphone jack is pink.
2. Configure Microphone Settings in Windows
- Open Sound Settings:
- Press
Windows + Ito open the Settings app. - Navigate to “
System” > “Sound.”
- Press
- Select Your Microphone:
- Under the “
Input” section, click on the drop-down menu and select your microphone from the list of available devices.
- Under the “
- Test Your Microphone:
- Speak into your microphone, and you should see the “
Test your microphone” bar moving. If it does, your microphone is working.
- Speak into your microphone, and you should see the “
Adjusting Microphone Settings
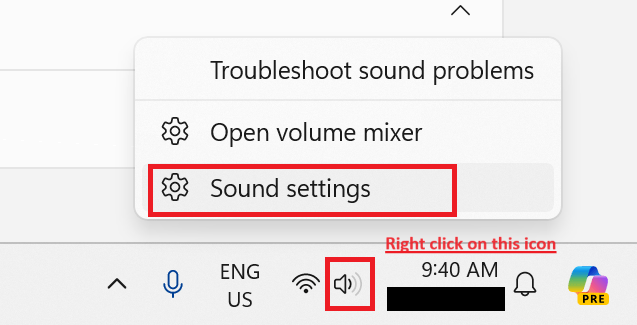
- Open Sound Control Panel:
- In the Sound settings, click on “
Sound Control Panel” on the right side under “Related Settings.“ - Alternatively, right-click on the speaker icon in the system tray and select “
Sounds.” 
- On some computers you have to choose “
other sound settings” to get to the sound control panel.
- In the Sound settings, click on “
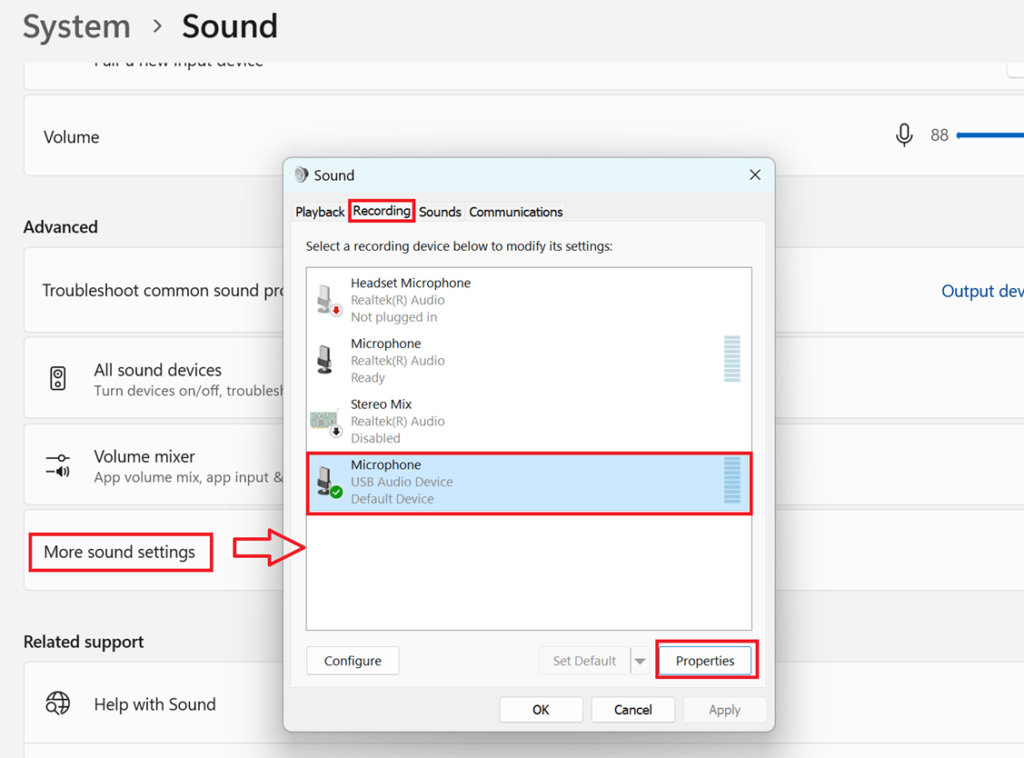
- Adjust Microphone Levels:
- In the Sound Control Panel, go to the “
Recording” tab. - Select your microphone and click on “
Properties.” - Go to the “
Levels” tab and adjust the microphone volume. You can also boost the microphone if needed.
- In the Sound Control Panel, go to the “
- Enhancements:
- In the same properties window, you can go to the “
Enhancements” tab (if available) to enable features like noise suppression and echo cancellation.
- In the same properties window, you can go to the “
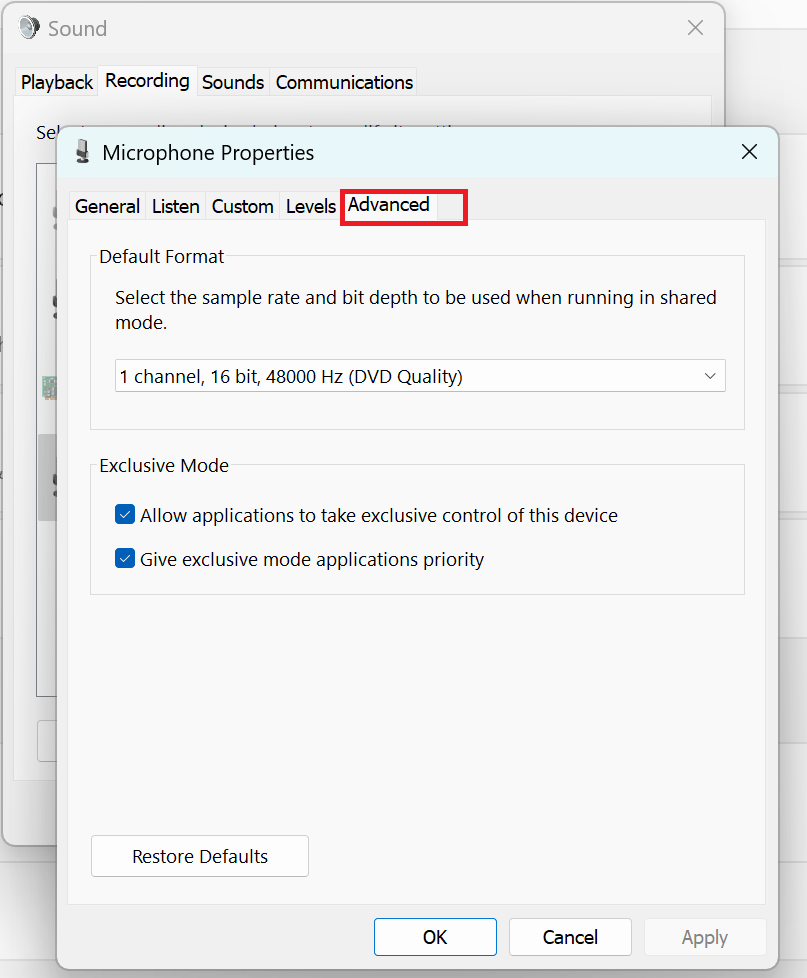
- Advanced Settings:
- In the “
Advanced” tab, you can change the default format (bit rate and sample rate) to match your recording needs.
- In the “

Troubleshooting Common Microphone Issues
Issue 1: Microphone Not Working
- Check Connections:
- Ensure the microphone is properly connected to your computer.
- Try plugging the microphone into a different USB port or audio jack.
- Set as Default Device:
- In the Sound Control Panel, go to the “
Recording” tab. - Right-click on your microphone and select “
Set as Default Device.”
- In the Sound Control Panel, go to the “
- Update Drivers:
- Press
Windows + Xand select “Device Manager.” - Expand the “
Sound, video, and game controllers” section. - Right-click on your microphone and select “
Update driver.“ - Choose “
Search automatically for updated driver software.”
- Press
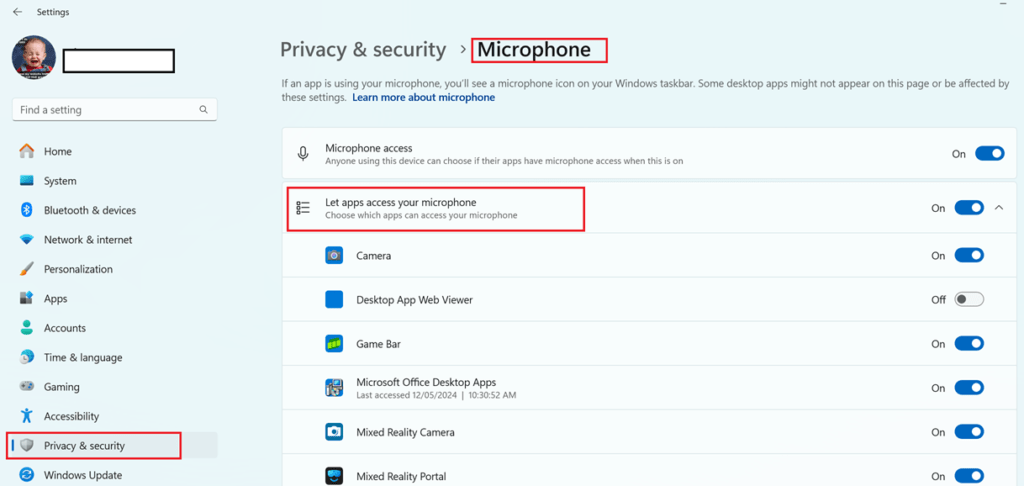
- Check Privacy Settings:
Checking privacy settings is crucial to ensure that your microphone is accessible only to the applications you trust, protecting your personal conversations from unauthorized access. By reviewing these settings, you can prevent unwanted background apps from listening in, which enhances your overall security and privacy. Additionally, proper privacy settings help troubleshoot microphone issues by ensuring the correct permissions are granted to the apps that need them.
- Go to
Settingsby pressingWinkey+Ion keyboard - Then choose
Privacy(or Privacy and Security) - Choose
Microphonefrom the list . - Ensure that “
Allow apps to access your microphone” is turned on. - Scroll down and ensure the specific app you’re using has permission to access the microphone.

Issue 2: Low Microphone Volume
- Adjust Levels:
- In the Sound Control Panel, go to the “
Recording” tab. - Select your microphone and click “
Properties.” - Go to the “
Levels” tab and increase the volume and boost levels if needed.
- In the Sound Control Panel, go to the “
- Disable Exclusive Mode:
- In the microphone properties, go to the “
Advanced” tab. - Uncheck the boxes under “
Exclusive Mode” to prevent applications from taking exclusive control of the device.
- In the microphone properties, go to the “
- Check App Settings:
- Ensure the application you’re using has its own microphone settings configured correctly.

Issue 3: Distorted or Noisy Audio
- Enable Enhancements:
- In the Sound Control Panel, go to the “
Recording” tab. - Select your microphone and click “
Properties.” - Go to the “
Enhancements” tab and enable noise suppression and echo cancellation.
- In the Sound Control Panel, go to the “
- Move Microphone:
- Ensure the microphone is not too close to the speakers or other sources of interference.
- Check Environmental Factors:
- Minimize background noise and use a pop filter if necessary.
Conclusion
By following these steps, you can set up your microphone in Windows, adjust the necessary settings, and troubleshoot common issues to ensure optimal performance. Whether you’re using a USB microphone or one with a 3.5mm jack, proper configuration and maintenance are key to clear and reliable audio input.


