
Securing Remote Desktop Protocol (RDP) on Windows is essential to protect your system from unauthorized access, brute-force attacks, and ransomware threats. While RDP is a powerful tool for remote access, leaving it exposed without proper safeguards makes your computer a prime target for cybercriminals.
In this ultimate guide, you’ll learn how to secure RDP with step-by-step instructions — including IP restrictions, two-factor authentication, Network Level Authentication (NLA), firewall rules, port changes, and more. Whether you’re an IT admin or a remote worker, these tips will help you lock down RDP and stay safe online.
Why Securing Remote Desktop Protocol is So Important
By default, RDP listens on TCP port 3389. If this port is exposed to the internet, attackers can scan it and try to gain unauthorized access.
RDP attacks are commonly used to:
- Brute-force login credentials
- Install ransomware or malware
- Move laterally within networks
- Exfiltrate sensitive data
To prevent this, you need to harden RDP using multiple layers of defense.
1. Restrict RDP Access by IP Address
Limiting RDP to specific IP addresses drastically reduces exposure. Only allow trusted IPs such as your home, office, or VPN. Also see beginners guide to Windows Firewall.
How to restrict RDP by IP using Windows Firewall:
- Press
Win + R, typewf.msc, and press Enter - Go to Inbound Rules
- Locate and double-click Remote Desktop (TCP-In)
- Go to the Scope tab
- Under Remote IP address, select These IP addresses
- Click Add and enter your trusted IP address
- Click OK, then Apply
If your IP is dynamic, consider using a VPN or Dynamic DNS service.
2. Add Two-Factor Authentication (2FA) to RDP (Free Options)
Windows doesn’t natively support 2FA for RDP, but you can add it using free tools that enhance login security without extra cost.
Free 2FA for RDP:
1. miniOrange (Free Plan Available)
- Supports Google Authenticator and OTP apps
- Easy setup with installer and cloud-based dashboard
- Works with Windows login and RDP
- miniorange.com
2. MultiOTP (Completely Free & Open Source)
- Offline, open-source 2FA solution
- Supports TOTP/HOTP apps (Google Authenticator, Authy)
- Includes a Credential Provider for Windows login
- multiotp.net
3. Rublon (Free for Small Teams)
- Adds 2FA to Windows login and RDP
- Simple setup, cloud-managed
- Supports mobile push, TOTP apps, and email codes
- rublon.com
These options ensure that even if a password is stolen, attackers can’t log in without your second factor — a crucial layer of protection for RDP.
3. Change the Default RDP Port
The default port 3389 is constantly scanned by attackers. Changing it can reduce brute-force attempts.
How to change the RDP port:
- Press
Win + R, typeregedit, and press Enter - Navigate to:
HKEY_LOCAL_MACHINE\System\CurrentControlSet\Control\Terminal Server\WinStations\RDP-Tcp - Find the
PortNumberentry - Right-click, choose Modify, switch to Decimal view
- Enter a new unused port (e.g. 49852) and restart your computer
Important: Allow the new port in Windows Firewall and block port 3389 if no longer needed.
4. Enable Network Level Authentication (NLA)
NLA requires users to authenticate before a full RDP session is created. This protects against unauthenticated attacks.
How to enable NLA:
- Go to System > Remote Desktop
- Enable “Allow connections only from computers running Remote Desktop with Network Level Authentication”
NLA is lightweight but adds a significant layer of protection.
How to Enable Network Level Authentication (NLA)
Method 1: Enable NLA via System Settings (GUI)
- Right-click on This PC or My Computer, then select Properties
- Click Remote Desktop or go to:
Settings > System > Remote Desktop - Under the Remote Desktop section, make sure Remote Desktop is enabled
- Below that, check the box labeled:
“Allow connections only from computers running Remote Desktop with Network Level Authentication (recommended)” - Click Confirm or Apply
Now, RDP connections must authenticate before establishing a session — protecting you from many automated attacks.
Method 2: Enable NLA via Group Policy (for advanced users or admins)
This method is ideal for managing multiple systems in an organization.
- Press
Win + R, typegpedit.msc, and press Enter - Navigate to:
Computer Configuration > Administrative Templates > Windows Components > Remote Desktop Services > Remote Desktop Session Host > Security - Find the setting:
“Require user authentication for remote connections by using Network Level Authentication” - Double-click it and set it to Enabled
- Click Apply and OK
This ensures NLA is enforced system-wide and prevents non-NLA clients from connecting.
5. Use Strong Passwords and Lockout Policies
Weak passwords are a top cause of RDP breaches. Combine strong passwords with account lockouts to prevent brute-force attacks.
How to set lockout policies:
- Press
Win + R, typesecpol.msc, and press Enter - Navigate to Account Policies > Account Lockout Policy
- Configure:
- Account lockout threshold: 5
- Account lockout duration: 15–30 minutes
- Reset counter after: 15 minutes
This setting protects your system from brute-force attacks by locking user accounts after repeated failed login attempts. Combined with strong passwords, it helps prevent hackers from guessing your credentials through automated login attempts.
6. Monitor RDP Logs for Suspicious Activity
Event Viewer provides detailed logs of successful and failed RDP logins.
How to monitor RDP activity:
- Open Event Viewer by press
Win + Ron your keyboard to open the Run dialog box - Type:
eventvwr - Press Enter
- This will launch the Event Viewer instantly.
- Navigate to Windows Logs > Security
- Watch for:
- 4624 – Successful logon
- 4625 – Failed logon
- 4778 / 4779 – RDP session connect/disconnect
Set up alerts or use a monitoring tool for better visibility.
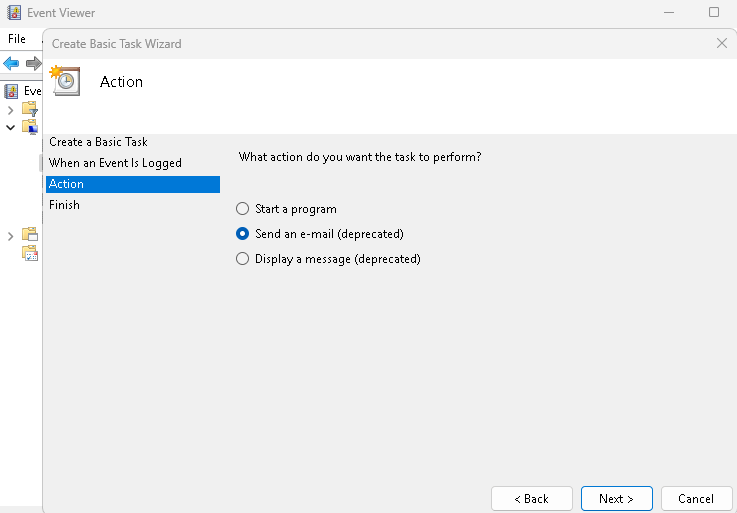
You can also create a basic task that will monitor a particular ID and alert you by sending an email, starting a program, or displaying a message.
This allows you to track successful and failed Remote Desktop login attempts in real time. Monitoring these logs helps detect brute-force attacks, unauthorized access, or suspicious session activity — giving you a chance to act before damage is done.
7. Use a VPN or Remote Desktop Gateway
Exposing RDP to the public internet is risky. Instead:
- Use a VPN to restrict access to your private network
- Or set up a Remote Desktop Gateway (RD Gateway) to encrypt traffic and support 2FA
Using a VPN or RD Gateway hides your RDP service from the public internet, protecting it from direct scans, brute-force attacks, and exploits. These tools add encryption and optional two-factor authentication, creating a secure tunnel for remote access.
8. Disable RDP When Not in Use
If you don’t need RDP temporarily, it’s safer to turn it off.
How to disable RDP:
- Go to System > Remote Desktop
- Toggle off “Enable Remote Desktop”
Alternatively, you can disable the Remote Desktop Services in services.msc.
Quick Checklist: RDP Security Best Practices
- ✅ Restrict RDP by IP address
- ✅ Enable 2FA using Duo or RD Gateway
- ✅ Change the default port from 3389
- ✅ Use Network Level Authentication (NLA)
- ✅ Enforce strong passwords and account lockouts
- ✅ Monitor logs for login activity
- ✅ Use VPN or RD Gateway for external access
- ✅ Disable RDP when not needed
Final Thoughts
Securing Remote Desktop Protocol (RDP) on Windows is one of the most important steps you can take to protect your system from cyberattacks. By combining IP restrictions, strong passwords, two-factor authentication, Network Level Authentication (NLA), and customized firewall rules, you significantly reduce the risk of unauthorized access and brute-force attacks.
Whether you’re using RDP for remote work, server management, or IT support, these best practices ensure you’re doing so safely and responsibly. Take the time to implement these measures now — securing RDP isn’t just a precaution, it’s a necessity.

