Disk errors can be a major source of frustration, leading to system instability, data loss, and reduced performance. Whether you’re dealing with a mechanical hard drive (HDD) or a solid-state drive (SSD), identifying and addressing disk errors promptly is crucial for maintaining the health and efficiency of your computer.
Over the years, I’ve encountered numerous instances where diagnosing disk errors not only saved valuable data but also prevented potential hardware failures. This comprehensive tutorial is designed to guide you through the process of diagnosing and troubleshooting disk errors on your system.
In this step-by-step guide, we’ll explore various methods to detect and fix disk errors using built-in Windows system tools and other reliable techniques. From using the Windows Error Checking utility to employing advanced command-line tools like CHKDSK and SFC, you’ll learn how to pinpoint issues and take corrective actions effectively. Whether you’re a novice or an experienced user, these instructions will help you ensure your drives are functioning optimally, safeguarding your data and enhancing your computer’s performance.
Let’s dive into the details and start diagnosing those disk errors!
Types of Disks
1. Hard Disk Drives (HDDs)
- Characteristics: Mechanical components, spinning platters, magnetic storage.
- Common Issues: Wear and tear, bad sectors, physical damage.
2. Solid State Drives (SSDs)
- Characteristics: No moving parts, faster read/write speeds, NAND flash memory.
- Common Issues: Wear levelling, firmware issues, data corruption.
3. External Drives (HDDs and SSDs)
- Characteristics: Portable, used for backups and additional storage.
- Common Issues: Connection issues, physical damage, corruption from improper ejection.
Diagnosing Disk Errors
Step 1: Back Up Your Data
Before diagnosing and fixing disk errors, it’s crucial to back up your important data to prevent any potential data loss.
- Connect an external drive (HDD/SSD) or use a cloud storage service.
- Copy important files and folders to the backup location.
Step 2: Use Built-in Windows Tools
1. Check Disk (CHKDSK)
The CHKDSK utility scans your disk for errors and fixes logical file system errors.
How to Run CHKDSK:
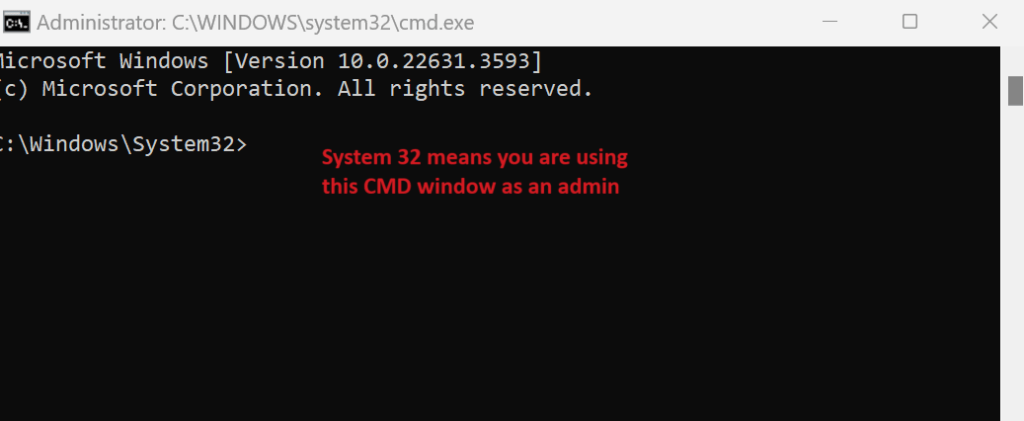
- Open Command Prompt as an Administrator:
- Press
Windows + Rto open the “run dialogue box.” - Type “
cmd” into the box. - Hit the
Shift + CTRL + Enterkey on the keyboard to open the command prompt as an admin. See screenshot below.
- Press
- Run CHKDSK:
- Type
chkdsk C: /f /rand press Enter. ReplaceC:with the letter of the drive you want to check. - Parameters:
/f: Fixes errors on the disk./r: Locates bad sectors and recovers readable information.
- Type

Example Command:
chkdsk C: /f /r
- Restart Your Computer (if required):
- CHKDSK may need to run during the next restart. Confirm by typing
Yand pressing Enter.
- CHKDSK may need to run during the next restart. Confirm by typing
2. Disk Management
Disk Management is a graphical interface to manage disks and volumes.
How to Use Disk Management:
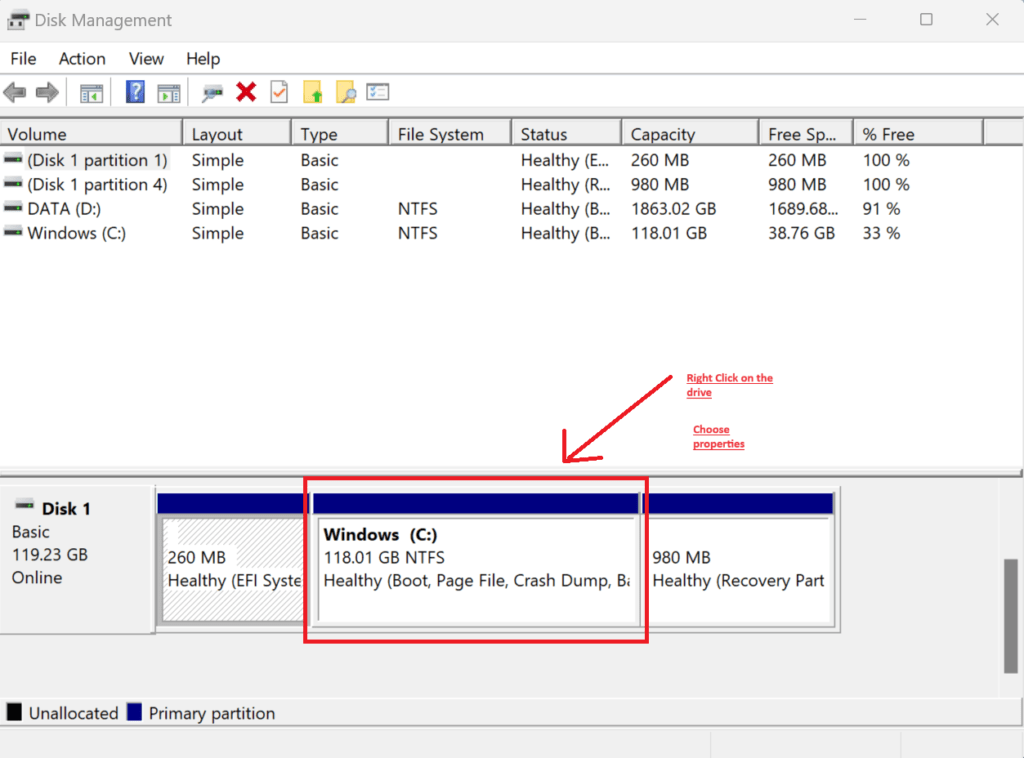
- Open Disk Management:
- Press
Windows + Xand select “Disk Management.”
- Press
- Check Disk Status:
- Look for any indications of issues (e.g., a drive marked as “Healthy” or “Failed”).
- Run Error Checking:
- Right-click the drive you want to check.
- Select “
Properties” > “Tools” > “Check.” - Follow the prompts to scan and fix errors.

Step 3: Use Manufacturer-Specific Tools
Most HDD and SSD manufacturers provide diagnostic tools to check the health of their drives.
Examples:
- Seagate SeaTools: For Seagate and Maxtor drives.
- Western Digital Data Lifeguard Diagnostics: For Western Digital drives.
- Samsung Magician: For Samsung SSDs.
- Intel SSD Toolbox: For Intel SSDs.
How to Use Manufacturer Tools:
- Download the Tool:
- Visit the manufacturer’s website and download the diagnostic tool.
- Install and Run the Tool:
- Follow the installation instructions.
- Open the tool and select the drive to be tested.
- Run Diagnostics:
- Use the tool’s diagnostic options to check for errors.
- Follow the prompts to fix any identified issues.
Step 4: Use Third-Party Tools
Several third-party tools offer advanced diagnostics for HDDs and SSDs.
Examples:
- CrystalDiskInfo: Provides detailed health information using S.M.A.R.T. data.
- HDDScan: Offers comprehensive diagnostics and error checking.
- HD Tune: Checks for errors and provides performance benchmarking.
How to Use Third-Party Tools:
- Download and Install the Tool:
- Visit the official website of the tool and download the installer.
- Run the Tool:
- Open the tool and select the drive to be tested.
- Run Diagnostics:
- Use the available options to check for errors and assess drive health.
- Follow the prompts to address any issues found.
Step 5: Interpret the Results
After running diagnostics, you’ll need to interpret the results to determine the next steps.
Common Outcomes:
- No Errors Found: The drive is healthy.
- Logical Errors Found: These can often be fixed by the tools mentioned.
- Physical Damage: Consider professional data recovery services if the drive is critically damaged.
Step 6: Take Preventive Measures
To avoid future disk errors, follow these preventive measures:
- Regular Backups: Frequently back up your data.
- Proper Shutdowns: Always shut down your computer properly.
- Avoid Physical Impact: Handle your drives carefully.
- Use Antivirus Software: Protect against malware that can cause data corruption.
By following these steps, you can diagnose and fix most common disk errors, ensuring the longevity and reliability of your storage devices. For more detailed instructions, you can refer to the official support pages of your operating system or the manufacturer of your drive.


