In today’s digitally-driven world, seamless connectivity between computers and external devices such as USB drives, printers, scanners, and external hard drives is crucial for productivity and efficiency. However, it’s not uncommon to encounter situations where a computer fails to recognize a connected device. This issue can be frustrating and disruptive, especially when you need immediate access to important files or need to use essential peripherals for work or personal tasks.
Whether you’re facing this problem with a new device or one that previously worked without issues, understanding the potential causes and solutions is essential. The reasons for a computer not recognizing a device can range from simple connection errors and driver issues to more complex hardware or software problems. Fortunately, there are several troubleshooting steps you can take to resolve these issues and restore functionality.
This comprehensive guide will walk you through various methods to diagnose and fix problems related to device recognition on different versions of Windows. From basic checks like verifying physical connections to more advanced solutions such as updating drivers and adjusting power management settings, we’ll cover all the necessary steps to help you get your devices working again.
Why This Happens
Devices may fail to be recognized for several reasons, including:
- Physical Connection Issues: Loose or faulty connections can prevent devices from being detected.
- Driver Problems: Outdated, missing, or corrupted drivers can cause recognition issues.
- Power Management Settings: Power-saving settings may turn off USB ports to conserve energy, leading to unrecognized devices.
- System Errors: Conflicts within the operating system or firmware can impede device functionality.
- Device Compatibility: The device may not be compatible with your current operating system version.
What This Guide Will Cover
In this guide, you will learn:
- How to perform basic checks and fixes for physical connection issues.
- Steps to update or reinstall device drivers.
- How to adjust power management settings to ensure continuous power to USB ports.
- Methods to run built-in troubleshooters to diagnose and resolve common problems.
- Advanced tips for resolving persistent issues, including checking for system updates and testing devices on other computers.
By following these detailed steps, you can effectively troubleshoot and resolve most issues that prevent your computer from recognizing external devices, ensuring that you maintain productivity and avoid unnecessary interruptions.
Importance of Connectivity in Modern Computing
Ensuring that your computer recognizes and efficiently uses external devices is vital in today’s environment. External devices extend the functionality of your computer, enabling tasks ranging from data storage and transfer to printing documents and scanning images. Maintaining proper connectivity ensures that you can perform these tasks without interruption, which is essential for both personal and professional activities.
Let’s dive into the step-by-step process to troubleshoot and fix the issue of your computer not recognizing your external device.
1. Check the Physical Connection
- Verify the Connection:
- Ensure the device is properly connected to your computer. Unplug and reinsert the device to ensure a secure connection.
- Try a Different Port:
- Connect the device to a different USB port on your computer. Sometimes, a particular port may be faulty.
- Inspect the Device:
- Check the device for any physical damage. If you’re using a USB cable, make sure it’s not damaged and is securely connected.
- Swap cords:
- If you have a spare USB cord or a printer cord try them as over time they can stop working.
2. Restart the Computer
- Restart the Computer:
- Sometimes, a simple restart can resolve connectivity issues. Reboot your computer and check if the device is recognized.
3. Update Drivers
- Open Device Manager:
- Press
Windows + Xand select “Device Manager.”
- Press
- Locate the Device:
- Look for the device under the appropriate category (e.g., “Universal Serial Bus controllers”
for USB devices, “Printers” for printers, etc.).
- Look for the device under the appropriate category (e.g., “Universal Serial Bus controllers”
- Update Driver:
- Right-click the device and select “
Update driver.” - Choose “
Search automatically for updated driver software.“
- Right-click the device and select “
- Install Manufacturer’s Drivers:
- Visit the device manufacturer’s website and download the latest drivers for your device. Follow the installation instructions provided by the manufacturer.
4. Check Device Manager for Errors
- Open Device Manager:
- Press
Windows + Xand select “Device Manager.”
- Press
- Look for Error Indicators:
- Check for any yellow exclamation marks or
red Xs next to devices, which indicate issues.
- Check for any yellow exclamation marks or
- Uninstall and Reinstall Device:
- Right-click the problematic device and select “
Uninstall device.“ - Restart your computer. Windows will attempt to reinstall the device driver.
- Right-click the problematic device and select “
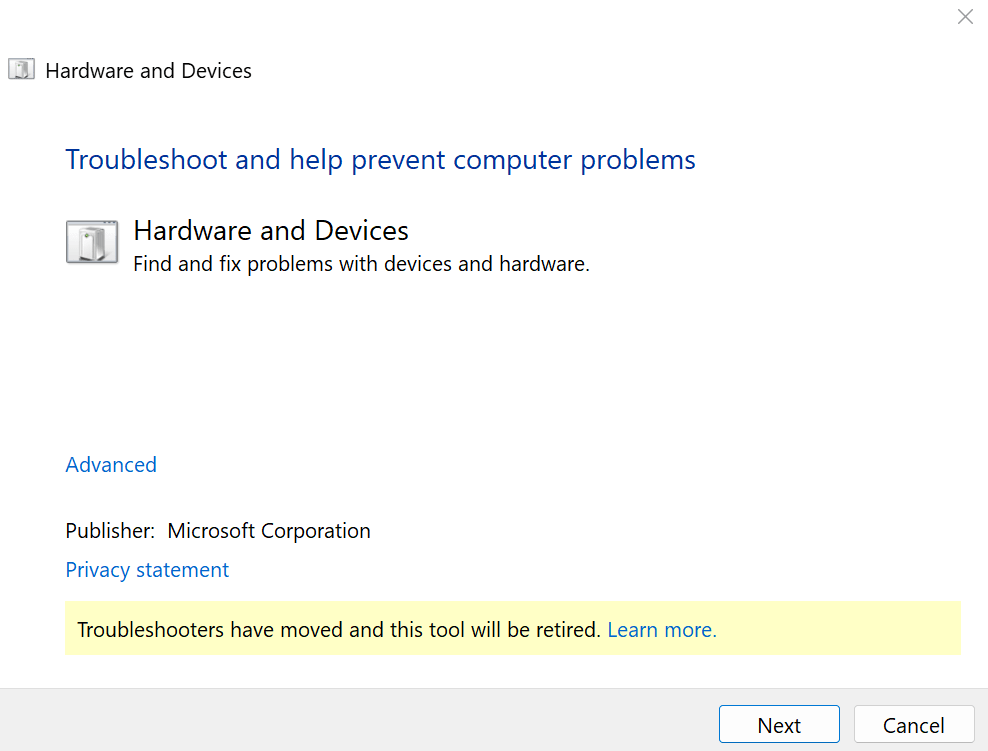
5. Run the Hardware and Devices Troubleshooter
This is the only way I could find this trouble-shooter on my Windows 11 computer. If you are running older versions of Windows, this way should also work for you.
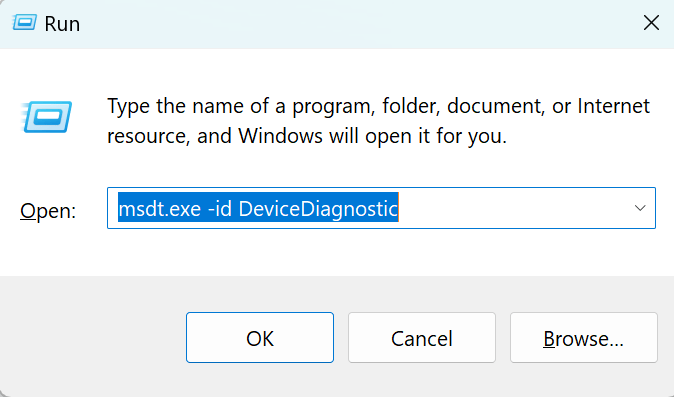
Open the Hardware and Devices trouble-shooter through Windows Run Dialog:

- Press
Windows + Rto open Windows Run dialog. - Type
msdt.exe -id DeviceDiagnosticin Run dialog and press Enter to open Hardware and Devices troubleshooter. - Click
Nextto run Hardware and Devices troubleshooter. It will automatically detect problems with your computer hardware and devices. You can decide to fix the problems or not by yourself.

6. Check Power Management Settings
When the computer is not recognising your USB port try this:
- Open Device Manager:
- Press
Windows + Xand select “Device Manager.”
- Press
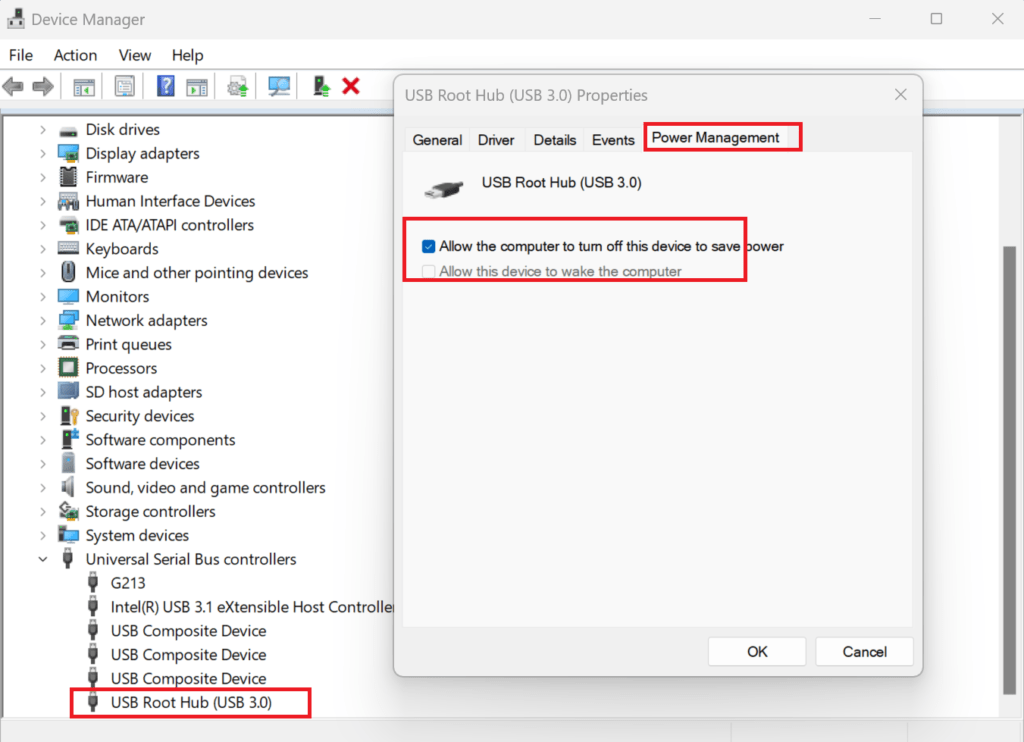
- Locate USB Root Hub:
- Expand “
Universal Serial Bus controllers” and find “USB Root Hub.”
- Expand “
- Adjust Power Management Settings:
- Right-click “
USB Root Hub,” select “Properties,” and go to the “Power Management” tab as show below. - Uncheck “
Allow the computer to turn off this device to save power.”
- Right-click “

7. Update Windows
- Open Settings:
- Press
Windows + Ito open Settings.
- Press
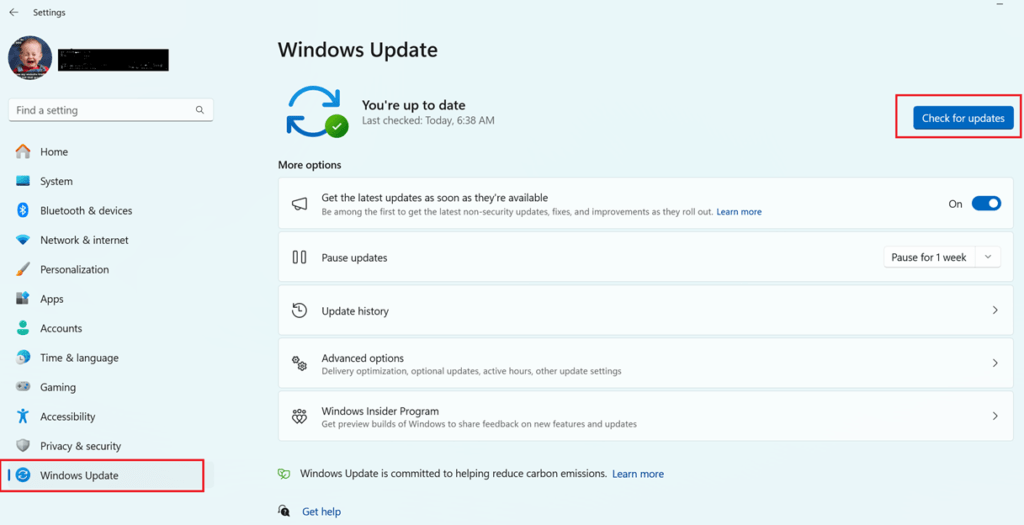
- Navigate to Home then Updates:
- Go to “
Home” > “Windows Update.” Earlier versions look for “Security and Updates.”
- Go to “
- Check for Updates:
- Click “
Check for updates” and install any available updates.
- Click “
Also see how to use the run dialog box to access Windows Updates.

8. Try the Device on Another Computer
- Test the Device:
- Connect the device to another computer to determine if the issue is with the device itself or your computer.
Additional Tips:
- Check for Firmware Updates: For some devices like printers and external drives, updating the device firmware can resolve compatibility issues.
- Use Disk Management: If an external drive is not recognized, open Disk Management (
Windows + X> “Disk Management“) to see if the drive appears and needs to be initialized or formatted or maybe you need to fix the MBR of your hard drive. - Check Device Compatibility: Ensure the device is compatible with your version of Windows.


