Managing user accounts in Windows 11 is essential for maintaining security and personalized settings for different users. This guide will walk you through creating, modifying, and deleting user accounts, along with important considerations and differences between account types.
Creating a User Account
Step-by-Step Instructions:
- Open Settings:
- Press
Windows + Ito open the Settings app.
- Press
- Navigate to Accounts:
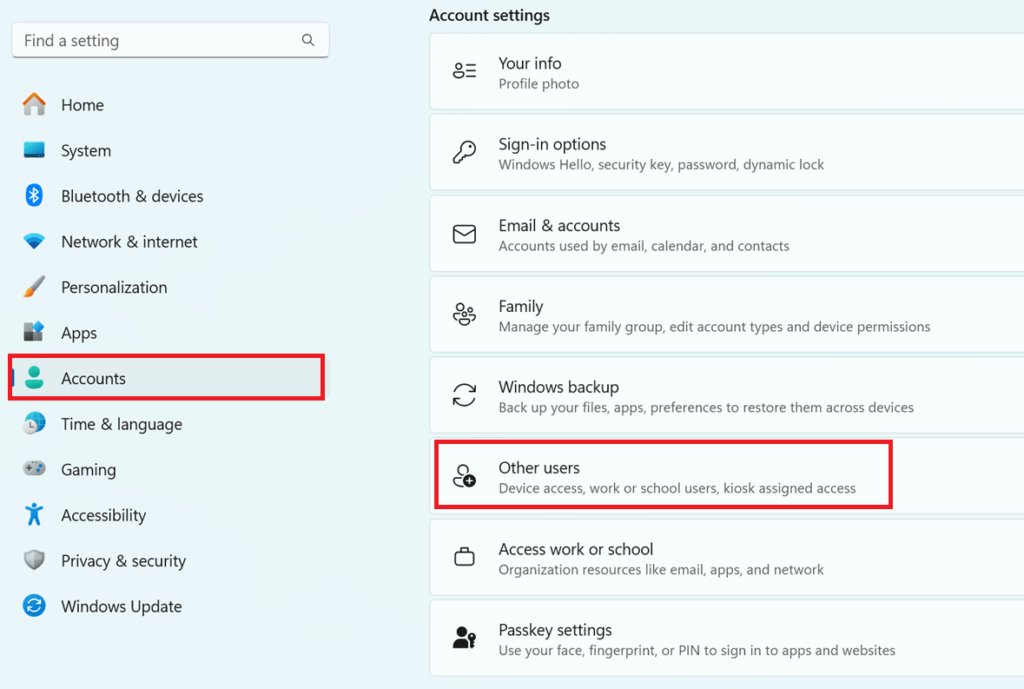
- Click on “Accounts” from the left-hand menu.
- Access Family & Other Users:
- Select “Family & other users” from the Accounts menu.
- Add a New User:
- Under the “Other users” section, click on “Add account.”
- Choose Account Type:
- If you want to create a Microsoft account, enter the email address and follow the prompts. To create a local account, select “I don’t have this person’s sign-in information” and then “Add a user without a Microsoft account.”
- Enter Account Details:
- Enter the username, password, and security questions for the new account. Click “Next” to complete the process.
Modifying a User Account
Step-by-Step Instructions:
- Open Settings:
- Press
Windows + Ito open the Settings app.
- Press
- Navigate to Accounts:
- Click on “Accounts” from the left-hand menu.
- Access Family & Other Users:
- Select “Family & other users” from the Accounts menu.
- Modify User Account:
- Select the account you want to modify under the “Other users” section.
- Click on “Change account type.”
- Change Account Type:
- Choose between “Administrator” or “Standard User” and click “OK.”
Deleting a User Account
Step-by-Step Instructions:
- Open Settings:
- Press
Windows + Ito open the Settings app.
- Press
- Navigate to Accounts:
- Click on “Accounts” from the left-hand menu.
- Access Family & Other Users:
- Select “Family & other users” from the Accounts menu.
- Delete User Account:
- Select the account you want to delete under the “Other users” section.
- Click on “Remove.”
- Confirm Deletion:
- Windows will prompt you to confirm the deletion and inform you that all data associated with the account will be deleted. Confirm by clicking “Delete account and data.”
Things to Watch For When Deleting a User Account:
- Data Loss: Deleting a user account will remove all files, settings, and data associated with that account. Ensure you back up any important data before proceeding.
- File Location: User files are typically located in
C:\Users\[username]. When an account is deleted, these files will be removed unless backed up elsewhere.
Differences Between Account Types
- Administrator:
- Privileges: Full control over the system, including installing software, changing system settings, and managing other user accounts.
- Use Case: Suitable for primary users who need complete access to the system.
- Standard User:
- Privileges: Limited control over the system. Can use installed software and change personal settings but cannot install software or make significant system changes.
- Use Case: Ideal for general use, especially for secondary users or children.
- Guest (Note: The Guest account is not enabled by default in Windows 11):
- Privileges: Very limited access. Cannot install software, change system settings, or access other users’ files.
- Use Case: Suitable for temporary users who need limited access to the computer.
Here is a video showing how to use local users and groups in Windows XP.
Conclusion
Managing user accounts in Windows 11 is straightforward and essential for maintaining system security and personalized user experiences. Whether you need to create, modify, or delete user accounts, following these steps will help you manage your computer effectively.


