
Keeping your Windows system healthy doesn’t always require third-party software. The built-in Windows command line tools are powerful utilities for diagnosing, repairing, and optimizing your system. Whether you’re fixing corrupted files, checking disk health, or resetting network settings, these tools are essential.
Below are the top 10 command line tools for Windows repair and maintenance, how to use them, and when they come in handy.
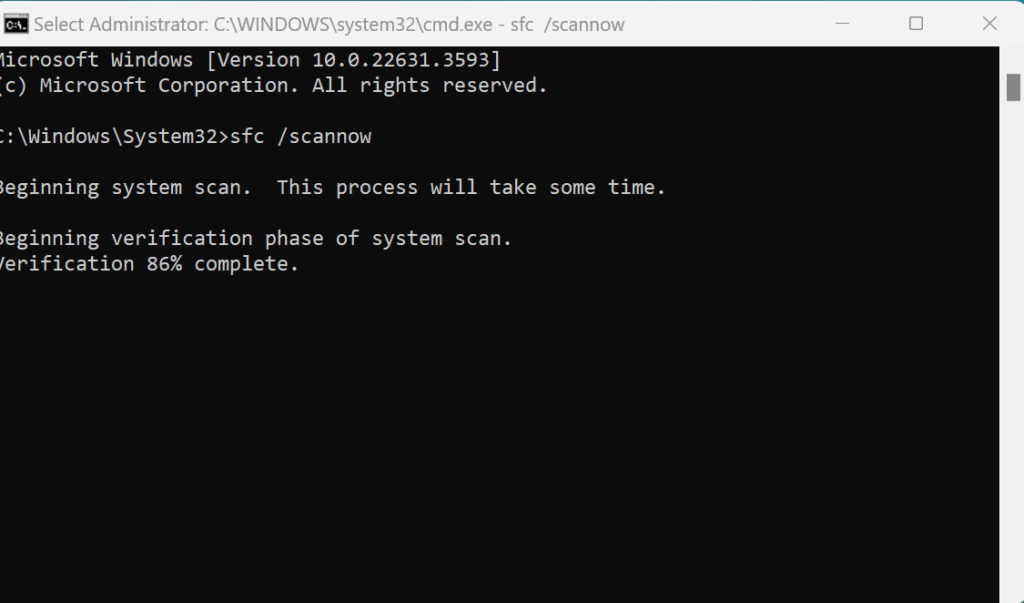
1. System File Checker (SFC)
Command: sfc /scannow
Purpose: The sfc /scannow command scans all protected system files on your Windows installation for corruption, unauthorized changes, or missing components. If any issues are found, it automatically replaces those files with the correct, original versions stored in the system cache. This tool is especially useful after malware removal, failed software installs, or unexpected system crashes.
It’s one of the most powerful first-response tools for resolving:
- Random system errors
- Missing
.dllfiles - Windows update failures
- Crashing programs or features not working properly
You should run this before considering reinstalling Windows, as it can often restore system stability without losing your files or apps. For more details see my post about the System File Checker Tool.
How to Use:
- Press
Start, typecmd, right-click Command Prompt, and select Run as administrator. - In the black window, type:
sfc /scannow - Press
Enter. - Let the scan finish. If it finds problems, it will attempt to fix them automatically.
Takes 10–30 minutes. You can keep using your PC during the scan.
2. DISM (Deployment Image Servicing and Management)
Command: DISM /Online /Cleanup-Image /RestoreHealth
Purpose: The DISM (Deployment Image Servicing and Management) tool is used to repair the underlying Windows system image that System File Checker (SFC) relies on. If sfc /scannow can’t fix all the problems—or keeps reporting errors—it may be because the source files SFC uses are themselves damaged.
Running this DISM command connects to Windows Update (or another repair source) to:
- Scan the health of the Windows image
- Restore corrupted files
- Fix update-related issues
- Rebuild critical system components
It’s often used after SFC fails, or when you’re experiencing:
- Windows update failures (like error 0x800f081f)
- Features not installing or working
- Persistent system slowdowns or crashes
Think of DISM as a deep-clean tool that repairs the foundation of Windows, making sure all components are in their proper state.
How to Use:
- Open Command Prompt as Administrator.
- Type the following and press Enter:
DISM /Online /Cleanup-Image /RestoreHealth - Wait while it scans and fixes your system image.
Requires internet connection. Takes 10–20 minutes.
3. CHKDSK (Check Disk)
Command: chkdsk /f /r
Purpose: CHKDSK (Check Disk) scans your hard drive for file system errors, disk corruption, and physical bad sectors. The /f flag tells it to fix any errors it finds, while the /r flag goes a step further by locating bad sectors and attempting to recover any readable data from them.
It’s especially useful when you’re dealing with:
- Slow boot times or system freezes
- Missing or corrupted files
- Strange noises from your hard drive
- Blue screens or random crashes
- Sudden drive disconnects or unreadable partitions
Running chkdsk /f /r is like giving your drive a health check and tune-up. It can prevent future data loss and may extend the usable life of your hard disk.
NOTE: It may require a reboot and take a long time, especially on large drives—so make sure to back up important data first. Also see why is my computer running slow?
How to Use:
- Open Command Prompt as Administrator.
- Type this and press
Enter:chkdsk C: /f /r - You’ll be asked to schedule a scan on the next restart. Type
Yand hitEnter. - Restart your computer.
May take an hour or more depending on disk size.
4. Netsh Winsock Reset
Command: netsh winsock reset
Purpose: This command resets the Winsock Catalog, which is a part of Windows that manages how programs communicate with the internet using TCP/IP.
Over time, or after malware infections, failed software installs, or VPN/browser extensions, Winsock can get corrupted—leading to issues like:
- No internet access
- “Limited” network connection
- Certain apps (like browsers or email clients) not being able to connect
- Network-related errors even when Wi-Fi or Ethernet is connected
By running netsh winsock reset, you effectively reset all network settings back to their default state, which can quickly resolve stubborn and mysterious connectivity problems.
QUICK TIP: Always restart your PC after running this command to apply the changes.
How to Use:
- Open Command Prompt as Administrator.
- Type:
netsh winsock reset - Press
Enter. - Restart your computer.
5. IPConfig (Flush and Renew IP Address)
Commands:
ipconfig /releaseipconfig /renewipconfig /flushdns
Purpose: The IPConfig suite of commands is used to manage and troubleshoot your computer’s IP address and DNS (Domain Name System) settings. These tools are essential when your computer can’t connect to the internet or has inconsistent network performance.
Here’s what each command does:
ipconfig /release:
Disconnects your current IP address from the network, essentially clearing your current network configuration.ipconfig /renew:
Requests a new IP address from your router or DHCP server. This is helpful if you’re experiencing IP conflicts or have no internet access.ipconfig /flushdns:
Clears the DNS resolver cache. This is helpful when websites aren’t loading properly or changes to domain records aren’t updating.
These commands are ideal for fixing:
- Unstable internet connections
- DNS-related errors
- “No internet access” messages
- Slow or failed website loading
Note: Run these commands in order (release → renew → flushdns) for a full refresh of your network stack.
How to Use:
- Open Command Prompt as Administrator.
- Run these one at a time:
ipconfig /release ipconfig /renew ipconfig /flushdns - Close the window and test your connection.
6. Diskpart – Windows Command Line Tools
Command: diskpart
Purpose: Diskpart is a powerful command-line utility used to manage hard drives, partitions, and volumes on your computer. It’s especially useful when graphical tools like Disk Management fail or when you’re working in environments like Safe Mode or recovery mode.
You can use diskpart to:
- View all connected drives
- Create, delete, or format partitions
- Assign or remove drive letters
- Clean a disk (completely wipe all data and partitions)
Typical scenarios where diskpart is helpful:
- A USB drive or external hard drive isn’t showing up
- You need to format a drive that Windows won’t recognize
- You’re preparing a new drive for Windows installation
- You want to fully clean a drive before selling or reusing it
Important Warning:
Diskpart does not offer an “undo” button — using commands like clean will permanently erase all data on the selected disk. Always double-check which disk you’re working with.
Example Usage:
- Run
cmdas Administrator - Type
diskpartand press Enter - Then use commands like:
list disk select disk 1 clean create partition primary format fs=ntfs quick assign
Tip: Use list disk and list volume to carefully identify drives before making changes.
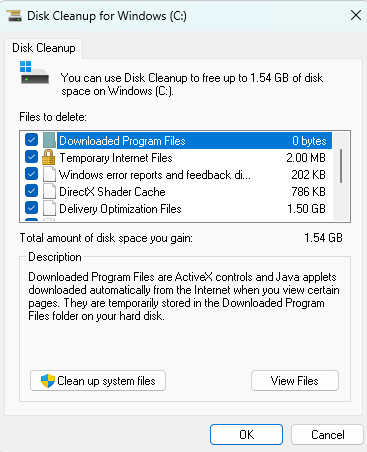
7. Cleanmgr (Disk Cleanup)
Command: cleanmgr
Purpose: Cleanmgr (Disk Cleanup) is a built-in Windows utility that helps you free up space by removing temporary files, cached data, system error reports, and other unnecessary clutter. While it’s often used through the graphical interface, you can launch it quickly using the cleanmgr command in Run or Command Prompt.
It’s useful for:
- Freeing up space on your C: drive
- Removing leftover files from Windows updates
- Clearing out temporary internet and system files
- Deleting memory dumps, log files, and other unused system data
This tool is especially handy when:
- You’re running low on disk space
- Your system is slowing down due to junk buildup
- You’re preparing for a large Windows update
How to Use:
- Press
Windows + R, typecleanmgr, and pressEnter - Choose the drive you want to clean (usually C:)
- Wait for it to analyze your drive
- Select the file categories you want to delete (Temporary Files, Recycle Bin, etc.)
- Click OK → then Delete Files
Advanced Use:
You can launch it with special switches for deeper cleanup:
cleanmgr /sageset:1
cleanmgr /sagerun:1
This allows custom cleanup tasks and automation.
Tip: Run cleanmgr regularly to prevent junk buildup and keep your system running smoothly.
Of all the Windows Command Line Tools, I use this one the most as part of my computer maintenance checklist.
8. Tasklist & Taskkill
Commands:
tasklist– shows running processestaskkill /IM program.exe /F– forces app to close
These two commands let you view and terminate running processes directly from the Command Prompt. They’re especially helpful when programs become unresponsive or when you want to kill background apps that don’t appear in Task Manager.
tasklist:
Displays a list of all active processes on your system, including their process IDs (PIDs), memory usage, and status. This is useful for identifying:
- High-resource apps slowing down your system
- Hidden background tasks
- Malware or suspicious processes
taskkill:
Forcibly closes a specific process using its name or PID.
Syntax:
taskkill /IM chrome.exe /F
Or using the PID:
taskkill /PID 1234 /F
/IM= Image name (the program’s executable)/F= Force the process to close
Common Use Cases:
- Closing frozen programs without restarting your PC
- Ending tasks that don’t respond in Task Manager
- Shutting down multiple instances of a program (e.g., stuck Chrome tabs)
- Killing malware or background processes during troubleshooting
Caution: Be careful when ending system-critical processes (like
explorer.exeorcsrss.exe) — it may cause your system to behave unexpectedly or crash.
How to Use:
- Open Command Prompt as Administrator.
- To list all tasks:
tasklist - Find the name of the app you want to close (e.g., chrome.exe)
- Then run:
taskkill /IM chrome.exe /F
9. Windows Command Line Tools – SFC /Scanfile
Command: sfc /scanfile=path\filename
Purpose: The sfc /scanfile command is a precision tool that scans and repairs a specific system file rather than your entire Windows installation. This is perfect when you know exactly which file is damaged—like a missing .dll or corrupt driver file—and don’t want to run a full sfc /scannow, which can take 15–30 minutes.
It uses the same file repair engine as sfc /scannow but with more speed and control.
Best Use Cases:
- You’re troubleshooting a specific Windows error linked to a known file (e.g.,
kernel32.dll,explorer.exe) - A program or feature fails with a missing or corrupt file message
- You want to avoid a full system scan and just target one known issue
How to Use:
- Open Command Prompt as Administrator
- Run the command with the full path to the file. Example:
sfc /scanfile=C:\Windows\System32\kernel32.dll
- Press
Enter. Windows will verify the file and replace it if needed.
Tip: Use this after locating the broken file from logs (like CBS.log) or error messages in Windows Event Viewer.
10. System Restore (from Command Line)
Command: rstrui.exe
Purpose: The rstrui.exe command is used to launch the System Restore wizard from the Command Line. System Restore allows you to roll your computer back to a previous working state without losing personal files—undoing recent system changes that may be causing problems.
This is extremely helpful when:
- Your PC won’t boot properly after an update or driver install
- You’re stuck in Safe Mode or Recovery Environment
- You want to undo a problem caused by registry edits, app installs, or system tweaks
When to Use:
- After installing a program or driver that caused instability
- When the system won’t start normally, but Safe Mode or CMD is available
- To reverse unintended changes without reinstalling Windows
How to Use:
- Press
Windows + R, typecmd, then right-click Command Prompt → Run as Administrator - In the CMD window, type:
rstrui.exe - Press
Enter. - The System Restore interface will open. Follow the prompts:
- Select a restore point
- Confirm and restart your system
Tip: If you can’t access Windows normally, you can run this from Advanced Startup → Command Prompt.
Note: This does not affect personal files (like documents or photos), but it will remove system-level changes, updates, and app installs made after the restore point.
How to Use:
- Open Command Prompt.
- Type:
rstrui.exe - Press
Enterto launch the restore interface. - Choose a restore point and follow the prompts.
Wrap-Up: Windows Command Line Tools at Your Fingertips
You don’t need to be a tech expert to keep your system running smoothly. These built-in Windows command line tools can resolve most performance and repair issues with zero extra software.
Keep this post bookmarked and try running SFC, DISM, and CHKDSK every few months as part of your PC maintenance routine.
Download This post to save to your computer. Download button below.

