

If your webcam isn’t working, follow these step-by-step troubleshooting methods to diagnose and fix the issue. Whether you’re experiencing a webcam not detected error, blurry video, or a completely black screen, this guide will help you with troubleshooting webcam problems on Windows 10, Windows 11, and macOS.
1. Check Physical Connections
For External Webcams:
- Ensure the webcam is properly plugged into a USB 2.0 or 3.0 port. Some older webcams may not work with USB 3.0 ports.
- Try using a different USB port or testing the webcam on another computer to check if it’s functional.
- Inspect the USB cable for damage, as a frayed or bent cable can prevent proper connections.
- Also see this post about the computer not recognising USB devices.
For Built-in Webcams:
- Ensure the webcam is not physically covered. Some laptops have built-in privacy shutters or physical kill switches that disable the camera.
- Look for a function key (F key) that enables/disables the webcam, such as Fn + F8 or Fn + Camera Key on some laptops.
Why this helps: A loose, damaged, or faulty connection can cause the webcam to not be detected by the computer. Troubleshooting webcam problems starts with ensuring a solid physical connection.
2. Restart Your Computer
- When Troubleshooting Webcam problems, a simple restart can resolve temporary glitches affecting the webcam by resetting background processes.
- If the issue is specific to an app (Zoom, Skype, Teams, etc.), restart the app as well.
Why this helps: Some applications or system processes may lock the camera, preventing other programs from accessing it. Restarting refreshes system drivers and releases any locked resources.
3. Check if Another App is Using the Camera
- Close all apps that might be using the webcam, such as Zoom, Skype, Microsoft Teams, Google Meet, OBS Studio, or Discord.
- Restart the app you’re trying to use and check if the webcam is now detected.
Why this helps: If one application has exclusive access to the webcam, other apps may be unable to use it. Closing all apps frees up access to the camera, making troubleshooting webcam problems easier.
4. Enable Camera Access in Settings
On Windows:
- Go to Settings → Privacy & Security → Camera.
- Make sure Camera access is turned ON for both system and apps.
- Scroll down and allow specific apps (e.g., Zoom, Skype) to use the camera.
On Mac:
- Go to System Settings → Privacy & Security → Camera.
- Enable camera access for the apps you want to use.
Why this helps: Privacy settings may block certain applications from accessing the webcam, even if the hardware is working correctly.
5. Test Your Webcam -Troubleshooting Webcam Problems
- Open Camera App (Windows) or Photo Booth (Mac) to check if the webcam is working.
- Use an online webcam test tool: https://webcamtests.com/
Why this helps: If the webcam works in another app or an online test, the problem is with a specific application, not the camera itself.
6. Update Webcam Drivers (Windows Only)
You might need to access device manger in windows to update drivers for your webcam.
- Press Win + X and open Device Manager.
- Expand Imaging Devices or Cameras.
- Right-click your webcam and select Update Driver.
- Choose Search automatically for updated drivers.
- Restart your PC after updating.
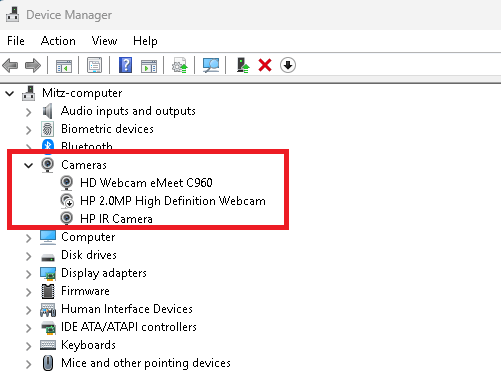
If updating doesn’t work:
- Right-click your webcam in Device Manager and select Uninstall Device.
- Restart your PC, and Windows will reinstall the webcam driver automatically.
- You can also see this post on how to troubleshoot and fix device recognition issues.
- Here is more details about understanding device drivers.
Why this helps: Outdated or corrupt drivers can cause the webcam to malfunction or not be detected by Windows. Keeping drivers updated is crucial.
7. Check for Windows or Mac Updates
- Windows: Go to Settings → Windows Update and check for updates.
- Mac: Open System Settings → Software Update.
Why this helps: Sometimes, system updates contain bug fixes that resolve webcam-related issues, especially after a recent OS upgrade.
8. Disable and Re-enable the Webcam
- Open Device Manager (Windows).
- Right-click on your webcam and select Disable device.
- Wait 10 seconds, then right-click and select Enable device.
Why this helps: This forces Windows to reinitialize the camera driver, which can fix issues caused by temporary glitches.
9. Try a Different Browser When Troubleshooting Webcam
- If the webcam isn’t working in Zoom, try using Google Meet or Microsoft Teams to test.
- If using a browser-based app, switch to a different browser (Chrome, Edge, Firefox).
Why this helps: Some apps or browsers may not have the correct permissions to access the webcam, or they might have software-specific bugs.
10. Check Antivirus & Privacy Settings
- Some antivirus software blocks the webcam for security reasons.
- Open your antivirus settings and disable webcam protection temporarily.
Why this helps: Security software may mistakenly block webcam access for privacy reasons. Disabling webcam protection can restore normal functionality.
Final Thoughts on Troubleshooting Webcam Problems
If your webcam still doesn’t work, you may have:
- A faulty camera module (especially for built-in webcams).
- Hardware failure – External webcams can wear out over time.
- Incompatibility issues – Some older webcams may not work with modern apps.
If none of these solutions work, consider replacing your webcam or using an external USB camera.
By following these steps, you should be able to successfully troubleshoot webcam problems and get your camera working again. Let me know if you need specific troubleshooting for a certain device or app!

